
Using Native Fetch With AlpineJs
One of the most common web app patterns involves collecting data from a form and submitting it to a REST API or, the opposite, populating a form from data originating from a REST API. This pattern can easily be achieved in Alpinejs using the native javascript Fetch Api. As a bonus, I describe the fetch async version at the end of the article.
If you are not familiar with the Alpinejs, checkout my introduction article and how can help you introduce simple interactions in your web page very easily.
If you do not like using the native fetch, there is the magic helper $fetch which is using Axios behind the scenes. I prefer to use the native javascript approach to a library that adds another ~15KB payload to my build. Nowadays, with the ability to cancel the fetch, I do not see a reason not to use it. But if you like the Axios library, know that there is an Alpinejs way to it, too.
Backend JSON Server
For testing purposes, we will use a free fake API powered by JSON Server and LowDB. Check these projects out cause they are amazing and may help in your endeavours. In this example, we hit the free fake API at https://jsonplaceholder.typicode.com/users/1, which returns the following data:
 1{
 2  "id": 1,
 3  "name": "Leanne Graham",
 4  "username": "Bret",
 5  "email": "[email protected]",
 6  "address": {
 7    "street": "Kulas Light",
 8    "suite": "Apt. 556",
 9    "city": "Gwenborough",
10    "zipcode": "92998-3874",
11    "geo": {
12      "lat": "-37.3159",
13      "lng": "81.1496"
14    }
15  },
16  "phone": "1-770-736-8031 x56442",
17  "website": "hildegard.org",
18  "company": {
19    "name": "Romaguera-Crona",
20    "catchPhrase": "Multi-layered client-server neural-net",
21    "bs": "harness real-time e-markets"
22  }
23}
We will only use the name,email, address.city, and address.street attributes from the JSON not to complicate the form structure too much.
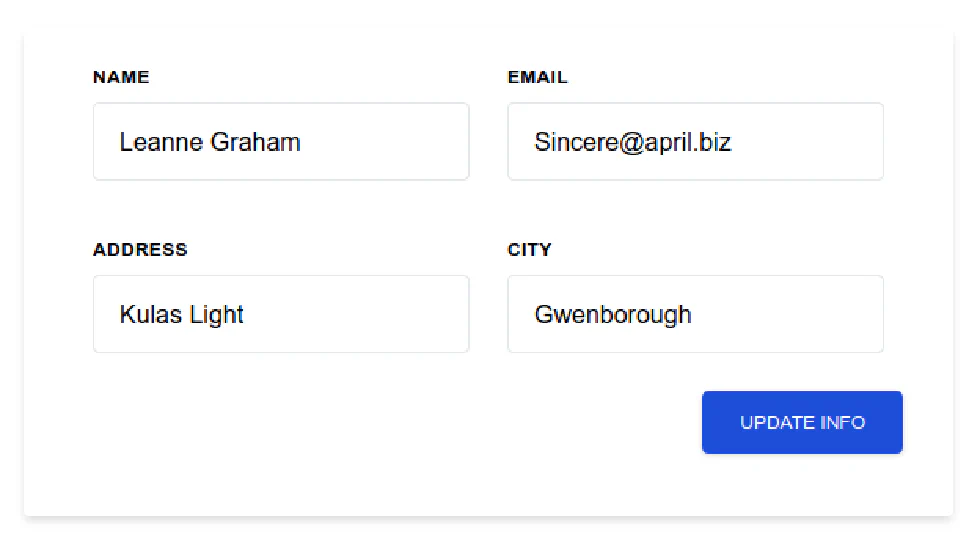
Below you may check up the final result. We use the native JavaScript fetch in an Alpinejs component to receive data to populate the form. You may change the form data, and by clicking on the “update info” button, we are making a POST request to an API Endpoint with the updated data. The endpoint does not exist. Therefore, it returns an error, but I want to show how to use the fetch to make a post request.
Form Design using tailwindcss
Initially, let’s build our form using the tailwindcss. Tailwindcss is a utility-first CSS that let you compose your design directly in your markup. It has the same philosophy as the Alpinejs so, they often grouped together.
 1<div class="flex flex-col content-center justify-center h-screen">
 2    <div class="flex flex-col self-center px-8 pt-6 pb-8 my-2 mb-4 bg-white rounded shadow-md max-w-7xl">
 3        <div class="mb-6 md:flex">
 4            <div class="px-3 mb-6 md:w-1/2 md:mb-0">
 5                <label class="block mb-2 text-xs font-bold tracking-wide uppercase text-grey-darker" for="name">
 6                    Name
 7                </label>
 8                <input
 9                    class="block w-full px-4 py-3 mb-3 border rounded appearance-none bg-grey-lighter text-grey-darker border-red"
10                    required type="text" id="name">
11            </div>
12            <div class="px-3 md:w-1/2">
13                <label class="block mb-2 text-xs font-bold tracking-wide uppercase text-grey-darker" for="email">
14                    email
15                </label>
16                <input
17                    class="block w-full px-4 py-3 border rounded appearance-none bg-grey-lighter text-grey-darker border-grey-lighter"
18                    required type="email" id="email">
19            </div>
20        </div>
21        <div class="mb-6 md:flex">
22            <div class="px-3 mb-6 md:w-1/2 md:mb-0">
23                <label class="block mb-2 text-xs font-bold tracking-wide uppercase text-grey-darker" for="address">
24                    Address
25                </label>
26                <input
27                    class="block w-full px-4 py-3 border rounded appearance-none bg-grey-lighter text-grey-darker border-grey-lighter"
28                    required type="text" id="address">
29            </div>
30            <div class="px-3 md:w-1/2">
31                <label class="block mb-2 text-xs font-bold tracking-wide uppercase text-grey-darker" for="city">
32                    City
33                </label>
34                <input
35                    class="block w-full px-4 py-3 border rounded appearance-none bg-grey-lighter text-grey-darker border-grey-lighter"
36                    required type="text" id="city">
37            </div>
38        </div>
39        <div class="flex justify-end mb-2 md:flex">
40            <button
41                class="inline-block px-6 py-2 text-xs font-medium leading-6 text-center text-white uppercase transition bg-blue-700 rounded shadow ripple hover:shadow-lg hover:bg-blue-800 focus:outline-none">
42                Update Info
43            </button>
44
45        </div>
46    </div>
47</div>
The above markup produces the following responsive form design:
Form Initialization
Next, we create an alpinejs component by defining an object person in the x-data attribute, which it stores all the information needed for the form:
1x-data="{ person : {
2          name: null,
3          email: null,
4          address: null,
5          city: null
6        }}"
The best time to get our values from the REST API and display them in the form is during the alpinejs component’s initialization using the x-init attribute:
 1 x-init="fetch('https://jsonplaceholder.typicode.com/users/1')
 2          .then(response=> {
 3              if (!response.ok) alert(`Something went wrong: ${response.status} - ${response.statusText}`)
 4              return response.json()
 5          })
 6          .then(data => person = {
 7              name: data.name,
 8              email: data.email,
 9              address: data.address.street,
10              city: data.address.city
11          })"
We are using the fetch to hit our REST endpoint, which returns a promise. At first, we resolve the response from the endpoint and check if it was a success. If not, we alert the user about the problem. To extract the JSON data from the response object, we use the json() command, which also returns a promise that it resolves at last to a javascript object containing the data returned from the endpoint. Finally, we are populated our person object with these data.
Two-way Form binding
To display the data in the form, we are binding the person object attributes to the corresponding input text boxes in our form using the x-model attribute. The x-mode attributes create a two-way binding between the input elements’ value and the value of corresponding person attributes. For example, for the name input box, we are two-way binding to the person.name:
1<input
2        x-model="person.name"
3        class="block w-full px-4 py-3 mb-3 border rounded appearance-none bg-grey-lighter text-grey-darker border-red"
4        required type="text" id="name">
Form Submission
Finally, by clicking the “UPDATE INFO” button, we are sending the form data to a REST endpoint by a POST request through the fetch command. To do that, we attach a listener to the click event using the Alpinejs event syntax @:event:
 1<button @click="fetch('/update', {
 2                    method: 'POST',
 3                    body: JSON.stringify(person)
 4                })
 5                .then(response => {
 6                    if (response.ok) alert('Updated Successfully!')
 7                    else alert(`Something went wrong: ${response.status} - ${response.statusText}`)
 8                })"
 9        class="inline-block px-6 py-2 text-xs font-medium leading-6 text-center text-white uppercase transition bg-blue-700 rounded shadow ripple hover:shadow-lg hover:bg-blue-800 focus:outline-none">
10    Update Info
11</button>
The fetch command will send a POST response to a non-existent endpoint, so the output will be an error alert. If you want to pass a header to the request, you may add it in the options object. For learning about available full options, you may check out the mozilla MDN web docs
 1<button @click="fetch('/update', {
 2                    method: 'POST',
 3                    body: JSON.stringify(person),
 4                    headers: {
 5                        'Content-Type': 'application/json'
 6                        }
 7                })
 8                .then(response => {
 9                    if (response.ok) alert('Updated Successfully!')
10                    else alert(`Something went wrong: ${response.status} - ${response.statusText}`)
11                })"
12        class="inline-block px-6 py-2 text-xs font-medium leading-6 text-center text-white uppercase transition bg-blue-700 rounded shadow ripple hover:shadow-lg hover:bg-blue-800 focus:outline-none">
13    Update Info
14</button>
The final code is:
 1    <div class="flex flex-col content-center justify-center h-screen">
 2        <div class="flex flex-col self-center px-8 pt-6 pb-8 my-2 mb-4 bg-white rounded shadow-md max-w-7xl"
 3            x-data="{ person : {
 4                        name: null,
 5                        email: null,
 6                        address: null,
 7                        city: null
 8                        }}"
 9            x-init="fetch('https://jsonplaceholder.typicode.com/users/1')
10                    .then(response=> {
11                        if (!response.ok) alert(`Something went wrong: ${response.status} - ${response.statusText}`)
12                        return response.json()
13                    })
14                    .then(data => person = {
15                        name: data.name,
16                        email: data.email,
17                        address: data.address.street,
18                        city: data.address.city
19                    })">
20            <div class="mb-6 md:flex">
21                <div class="px-3 mb-6 md:w-1/2 md:mb-0">
22                    <label class="block mb-2 text-xs font-bold tracking-wide uppercase text-grey-darker" for="name">
23                        Name
24                    </label>
25                    <input
26                        x-model="person.name"
27                        class="block w-full px-4 py-3 mb-3 border rounded appearance-none bg-grey-lighter text-grey-darker border-red"
28                        required type="text" id="name">
29                </div>
30                <div class="px-3 md:w-1/2">
31                    <label class="block mb-2 text-xs font-bold tracking-wide uppercase text-grey-darker" for="email">
32                        email
33                    </label>
34                    <input x-model="person.email"
35                        class="block w-full px-4 py-3 border rounded appearance-none bg-grey-lighter text-grey-darker border-grey-lighter"
36                        required type="email" id="email">
37                </div>
38            </div>
39            <div class="mb-6 md:flex">
40                <div class="px-3 mb-6 md:w-1/2 md:mb-0">
41                    <label class="block mb-2 text-xs font-bold tracking-wide uppercase text-grey-darker" for="address">
42                        Address
43                    </label>
44                    <input x-model="person.address"
45                        class="block w-full px-4 py-3 border rounded appearance-none bg-grey-lighter text-grey-darker border-grey-lighter"
46                        required type="text" id="address">
47                </div>
48                <div class="px-3 md:w-1/2">
49                    <label class="block mb-2 text-xs font-bold tracking-wide uppercase text-grey-darker" for="city">
50                        City
51                    </label>
52                    <input x-model="person.city"
53                        class="block w-full px-4 py-3 border rounded appearance-none bg-grey-lighter text-grey-darker border-grey-lighter"
54                        required type="text" id="city">
55                </div>
56            </div>
57            <div class="flex justify-end mb-2 md:flex">
58                <button @click="fetch('/update', {
59                                    method: 'POST',
60                                    body: JSON.stringify(person),
61                                    headers: {
62                                        'Content-Type': 'application/json'
63                                        }
64                                })
65                                .then(response => {
66                                    if (response.ok) alert('Updated Successfully!')
67                                    else alert(`Something went wrong: ${response.status} - ${response.statusText}`)
68                                })"
69                        class="inline-block px-6 py-2 text-xs font-medium leading-6 text-center text-white uppercase transition bg-blue-700 rounded shadow ripple hover:shadow-lg hover:bg-blue-800 focus:outline-none">
70                    Update Info
71                </button>
72
73            </div>
74        </div>
75    </div>
76</body>
Using async
Although, in the code above we are resolving the fetch promise through its classic approach, the async/await have achieve a very wide support on the modern browsers. So there nothing holding back to not use it (except for supporting legacy browsers). The only consideration is that alpinejs expects a function expression in its attributes instead of a function declaration. That means that we need to surround the arrow function with a self-execute function. Therefore, our x-init code is transformed:
 1x-init="(async () => {
 2                const response = await fetch('https://jsonplaceholder.typicode.com/users/1')
 3                if (! response.ok) alert(`Something went wrong: ${response.status} - ${response.statusText}`)
 4                data = await response.json()
 5                person = {
 6                            name: data.name,
 7                            email: data.email,
 8                            address: data.address.street,
 9                            city: data.address.city
10                        }
11            })()"
And the async/await version for the POST request code is:
1click="(async () => {
2                const response = await fetch('/api/update', {
3                    method: 'POST',
4                    body: JSON.stringify(person)
5                })
6                if (response.ok) alert('Updated Successfully!')
7                else alert(`Something went wrong: ${response.status} - ${response.statusText}`)
8            })()"
The final example using the async/await version is:
As you see, using the fetch command is very straightforward, and I think it is the preferred way to deal with REST APIs in our Alpinejs components.
Share: