Proxenos. Your Local Repository in ChatGPT through the Secure MCP Tunnel
Proxenos connects ChatGPT to selected directories on your Linux machine through the OpenAI Secure MCP Tunnel. ChatGPT may then read files, search code, inspect Git changes, edit files and run commands, according to the access level you choose for each directory.
A common belief is that ChatGPT only sees what you paste or upload into the conversation. This belief is not true anymore. With developer mode, ChatGPT can call the tools of any Model Context Protocol (MCP) server you connect to it.
An MCP server is a program that offers tools to a model, while an MCP client is the host that calls them on the model’s behalf. Here, ChatGPT is the client, and a small program on your machine is the server.
A simple setup, isn’t it? Well, not so much. ChatGPT runs on OpenAI’s servers, and your laptop sits behind a router. Something has to cross that gap.
I wrote Proxenos for a specific situation. The credits of my coding agent run out, and the work on my repositories stops until they renew. However, the normal ChatGPT chat still works. Proxenos connects that chat to my repositories, so I may keep doing extra work without spending any more credits. The name comes from ancient Greece: a proxenos was a citizen who hosted the envoys of a foreign city. This one hosts ChatGPT.
So the question of this article is simple: how does ChatGPT reach a machine that accepts no incoming connections? And when is this the right tool?
Who Opens the Connection
Every network connection has a side that listens and a side that dials. The listener must be reachable, which means an address and an open port. The classic way to connect ChatGPT to your own tools is a remote MCP server: you listen on the public internet, and ChatGPT dials in.
Unfortunately, an open port is open to everyone. Therefore, you also need a domain, a TLS certificate and an OAuth login in front of your files. A public tunnel like ngrok removes the open port, but it still publishes a URL that anyone may call.
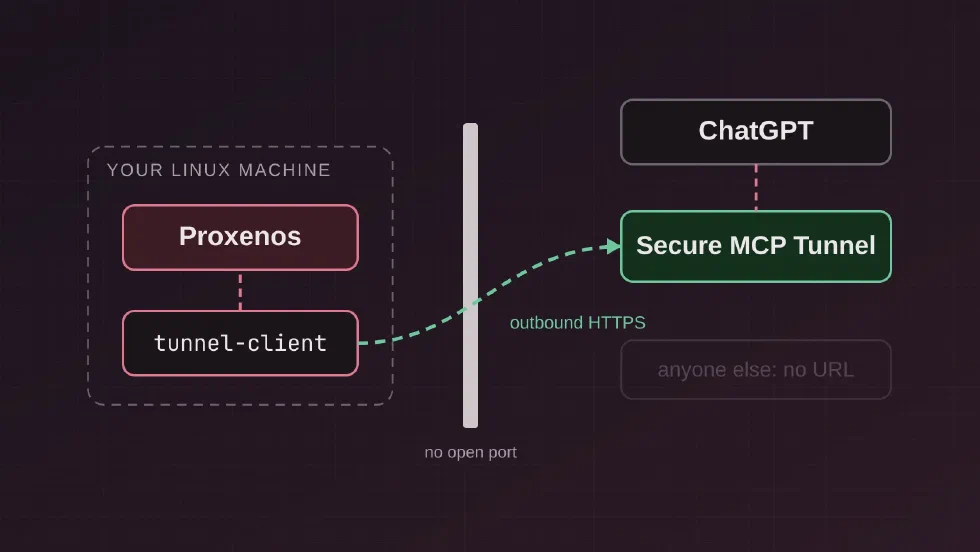
The Secure MCP Tunnel reverses the direction. A small official program, tunnel-client, runs on your machine and dials out to OpenAI. Nothing dials in. Pick each approach below to see who calls whom.
Your own server. ChatGPT lives on the internet, so it must reach your MCP server through an open port. That port is open to everyone, and you own the domain, the certificate and the OAuth login.
A public tunnel such as ngrok. An agent dials out, so no port is open on the router. However, the relay publishes a URL that anyone may call. Therefore, you still need authentication in front of your server.
The Secure MCP Tunnel. tunnel-client dials out to OpenAI over HTTPS
and waits. There is no public URL, and only ChatGPT workspaces tied to your tunnel can use it.
Your MCP server listens on a local Unix socket, not on a network port.
Your router already allows outbound HTTPS, since this is how your browser works. Hence, the tunnel needs no firewall rule, no port forwarding and no public IP. It also works behind a corporate NAT, or on a home server with no desktop at all.
Installation
Proxenos is a Kotlin application for Linux. It needs JDK 26, Git and a ChatGPT account with developer mode, plus access to tunnels in the OpenAI Platform.
git clone https://github.com/kzagoris/proxenos.git
cd proxenos
./gradlew installDist
cd build/install/proxenos
./bin/install-tunnel-client # downloads tunnel-client and verifies its checksum
./bin/wizard # creates the tunnel with you and stores its ID and key
./bin/tui # the dashboard; it starts the Runtime in the background
The wizard stores the tunnel ID and runtime key in ~/.config/proxenos/credentials with mode 0600. The Runtime refuses to start if anyone else can read that file.
In the dashboard, press n to register a directory and give it a name, such as my-app. What remains is to tell ChatGPT about your tunnel.
Configuring the Plugin in ChatGPT
ChatGPT reaches Proxenos through a plugin that points at your tunnel instead of a URL. You create it once, and it serves every workspace you register later. Keep the Runtime running while you do this, because ChatGPT asks it for the tool catalog through the tunnel.
- Open Settings → Security and login and enable Developer mode. A workspace administrator may need to allow it first.
- Open Plugins, select Add at the top right, and choose Create MCP App.
- Name it Proxenos. A short description, such as “Read and work with my registered local workspaces”, helps ChatGPT decide when to use it.
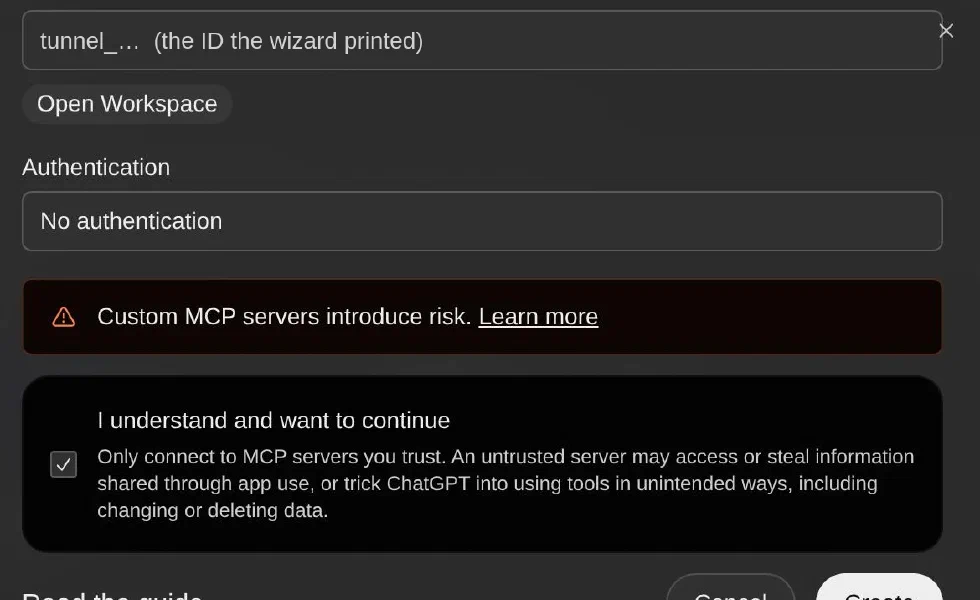
- Under Connection, switch from Server URL to Tunnel and paste the
tunnel_...ID that the wizard printed. - Set Authentication to No authentication. The tunnel already authenticates your machine with the runtime key, so the MCP endpoint needs no OAuth of its own.
- Tick I understand and want to continue, select Create, and then Connect Proxenos.
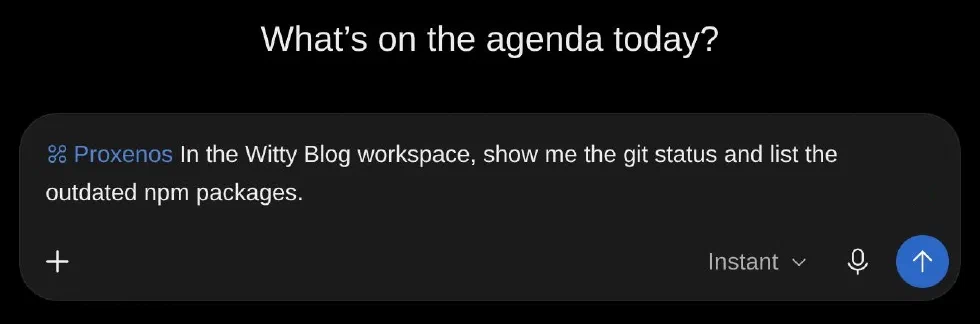
Now start a new chat, type @ and pick Proxenos from the list. Then ask in plain words. I tried it on the repository of this blog, which I registered as Witty Blog with the Command level:
With the default permission of ChatGPT, Allow low-risk tools, the git_status call ran at once. Running npm outdated needs run_command, which is not low-risk. Therefore, ChatGPT paused and asked me to approve it. Its See details link shows the exact command and the request_id, so you know what will run before you select Allow once. A few seconds later the answer came back:
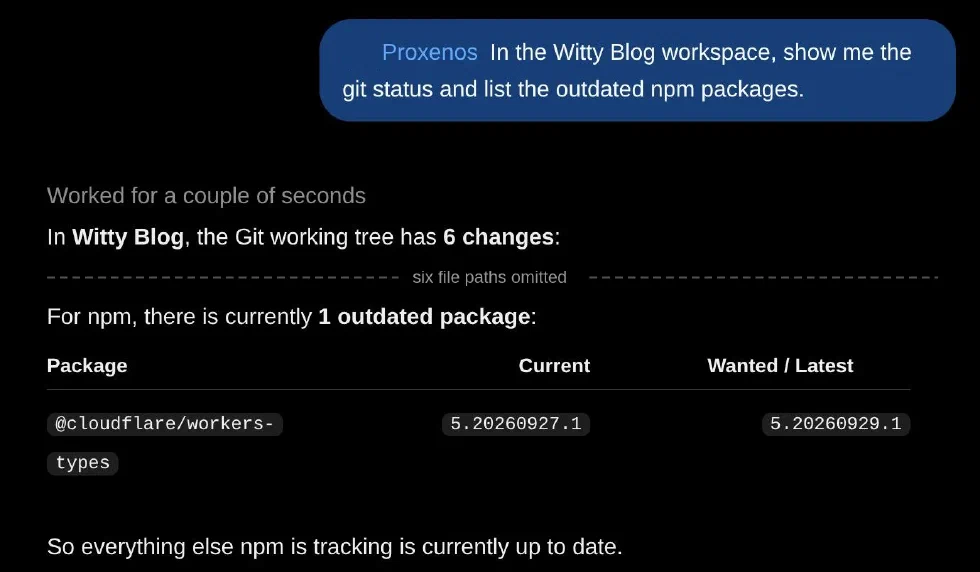
Both calls also appear in the Activity view of the dashboard, with the workspace, the command and its result. If the workspace were at Read, ChatGPT would still get the git status, but the Runtime would refuse the npm command with a plain error.
The Secure Tunnel
The trick behind the tunnel is an old one called long polling. tunnel-client sends an HTTPS request to OpenAI that asks “do you have anything for me?”. OpenAI does not answer at once. Instead, it holds the request open for up to 30 seconds.
If a tool call arrives from ChatGPT in the meantime, it travels back as the answer to that waiting request. If nothing arrives, the request ends empty, and tunnel-client immediately asks again.
I think of it as a post office box. The post office never learns your home address. You go and ask for your mail, and the clerk hands you whatever is there.
On your machine, tunnel-client does not talk to Proxenos over the network either. It forwards each call over a local Unix domain socket, a file that only your Linux user may open. Press play to follow one run_command call from the ChatGPT textbox to your disk and back.
1. You ask. You write "run the tests in my-app" in the normal
ChatGPT textbox. The model decides to call the run_command tool of Proxenos.
2. OpenAI holds the call. ChatGPT cannot open a connection to your laptop. Instead, it hands the call to the tunnel service, which keeps it until someone asks for it.
3. The call rides down a long poll. tunnel-client already has an
HTTPS request open to OpenAI, asking "anything for me?". The call arrives as the answer to that
request.
4. A local hop. tunnel-client forwards the call over a Unix
socket to the Runtime's MCP endpoint. Only your Linux user can open that socket.
5. The Runtime checks. It looks up the workspace argument, reads
its access level, and refuses if my-app is not at Command. Then it writes an
Activity entry, which the dashboard shows at once.
6. The work runs. The command starts in the workspace root with your account's permissions. The tunnel ID and key are stripped from its environment.
7. The answer goes back. The result travels the same path in reverse, as a new outbound request, and ChatGPT continues the conversation with the real output.
Two more details matter for security. First, the Runtime starts tunnel-client as its own child process and passes the credentials to it alone. Second, it strips those credentials from the environment of every command it runs. Otherwise, a command could print the tunnel key into a conversation that leaves your machine.
The dashboard talks to the Runtime over a separate socket with its own protocol. Consequently, changing an access level is not a tool in the ChatGPT catalog, and a conversation cannot even attempt it.
Access Levels
Each registered directory, a workspace in Proxenos terms, has a single dial with four positions. Every level includes the ones below it. Pick a level to see which of the 11 tools ChatGPT receives.
None. The workspace does not exist as far as ChatGPT is concerned. A call that names it gets the same answer as a name that was never registered.
Read. ChatGPT lists, reads and searches files, and inspects Git status, diffs and history. It cannot change anything. This is the level I start every new workspace at.
Write. Everything in Read, plus creating and editing files. Edits land through a temporary file and an atomic rename, so a half-written file never appears.
Command. Everything in Write, plus running programs. Take note that the command runs as you. The workspace is only the starting directory, not a sandbox, so the whole account box is in reach.
Please note the last position. Command runs programs with the full authority of your Linux account. The workspace root is the starting directory, not a sandbox, and once you enable it, the Runtime does not ask before each command. The dashboard asks you to confirm when you raise a workspace to Command, and every operation lands in its Activity view.
Long Commands and Repeated Calls
The tunnel has two habits that a naive server handles badly. I measured both against the live tunnel, since the documentation does not mention them.
The first is the time limit. A call has about 61 seconds before the tunnel gives up on it. Moreover, the stop button of ChatGPT never reaches your machine, so a stopped command keeps running.
The second is worse. When a call runs past that limit, the tunnel delivers it again, byte for byte the same. In one test, a single prompt executed the same two-minute operation four times. Pick a scenario to compare.
Fast commands just return. The tests finish in 20 seconds, well before the first dashed line, and ChatGPT receives the output in the same call.
The naive server. The tunnel gives a call about 61 seconds (second dashed line). Then it delivers the same call again, byte for byte. A server that just runs what arrives starts the build a second and a third time, while ChatGPT tells you it timed out.
Proxenos. At 45 seconds (first dashed line) the command is promoted: it keeps
running and ChatGPT receives a handle before the tunnel repeats the call. Later,
get_result collects the output. Every write and command also carries a
request_id, so a repeat that still arrives gets the first reply instead of a second
run.
Therefore, Proxenos never lets a command reach the limit. At 45 seconds it promotes the command: the command keeps running, and ChatGPT receives a handle for get_result. Furthermore, run_command, write_file and edit_file require a request_id. A repeated delivery carries the same id, so it gets the first reply instead of a second run. As a last guard, at most 4 commands run at the same time.
Pros and Cons
The advantages:
- No open port, no public URL, no domain, no certificate and no OAuth server to maintain.
- When your coding-agent credits are spent, you can still work on your repositories from the normal ChatGPT chat, without spending more credits.
- One tunnel serves every workspace, each with its own access level.
- It needs only a terminal, so a headless home server or a VM works as well as a laptop.
- Activity is an append-only record of every operation, including the ones that ran while you were away.
The limitations:
- Linux only, and it needs developer mode plus tunnel access in the OpenAI Platform. Both depend on your account and workspace policy.
- Every conversation that has the connector reaches every workspace above None. There is no per-chat subset.
- Command is not sandboxed. It is as powerful as your own terminal.
- The Runtime does not start on its own after a reboot. You open the dashboard or run
./bin/tui start. - Your files pass through OpenAI, as with any file you give ChatGPT, and each tool call forwards your approximate location.
- The tunnel is a young service, and its behavior may change under Proxenos. Proxenos is an independent project, not affiliated with OpenAI.
When to Use It
If you already work inside a dedicated coding agent, such as Codex or Claude Code, you do not need Proxenos while their credits last. Those tools run on your machine and were built for exactly this job. Once the credits are spent, Proxenos lets you continue the same work from the ChatGPT chat until they renew.
Proxenos is more suitable when you want ChatGPT itself, with its conversation history, projects and models, to look at your real files. For example, you may ask it to explain a repository, review the uncommitted diff, or run the test suite and discuss the failures. It is also a natural fit for a Linux server with no desktop, where no desktop app will ever run.
Finally, if you only need to show ChatGPT one file, uploading it is still simpler.
Overall, I find the Secure MCP Tunnel the simplest way I know to put a local machine behind ChatGPT, because it removes the whole public-server half of the problem. Of course, under the assumption that you trust ChatGPT with the directories you expose, and that you raise a workspace to Command only when you would also hand it your terminal.