Cross-component Communication Patterns in AlpineJs
One of the most frequent requirements when writing AlpineJs components is the communication between them. There are various strategies for how to tackle this problem. This article describes the four most common patterns that help pass information between different Alpinejs components.
As a simple example of the presenting patterns, I create a snackbar component from the material design guidelines. Snackbars are concise, informative messages about some event or the output of a process.
Let’s create the snackbar HTML structure and a button that initiates the message.
1<body>
2    <h1>Material Snackbar Example using Alpine.Js</h1>
3    <button class="button">Show Snackbar</button>
4    <h2>Click on the above button to see snackbar message</h2>
5    <div class="alpine-snackbar-wrapper">
6        <div class="alpine-snackbar-content">Sample Text</div>
7    </div>
8</body>
Next, we add the styles to mimic the material designs.
 1 body {
 2        font-family: 'Roboto', sans-serif;
 3}
 4
 5.alpine-snackbar-wrapper {
 6    min-width: 344px;
 7    max-width: 672px;
 8    min-height: 48px;
 9    background-color: #2196F3;
10    color: #fff;
11    text-align: center;
12    margin: auto 8px;
13    display: flex;
14    align-items: center;
15    padding: 0;
16    border-radius: 4px;
17    position: fixed;
18    right: 1%;
19    z-index: 1;
20    bottom: 30px;
21    box-shadow: 0 3px 5px -1px rgba(0, 0, 0, .2), 0 6px 10px 0 rgba(0, 0, 0, .14), 0 1px 18px 0 rgba(0, 0, 0, .12);
22}
23
24.alpine-snackbar-content {
25    flex-grow: 1;
26    font-size: 0.875em;
27    font-weight: 400;
28    padding: 14px 16px;
29}
30
31.button {
32    border: none;
33    padding: 14px 16px;
34    border-radius: 4px;
35    font-size: 1em;
36    background-color: #2196F3;
37    color: white;
38    cursor: pointer;
39}
The end result is:
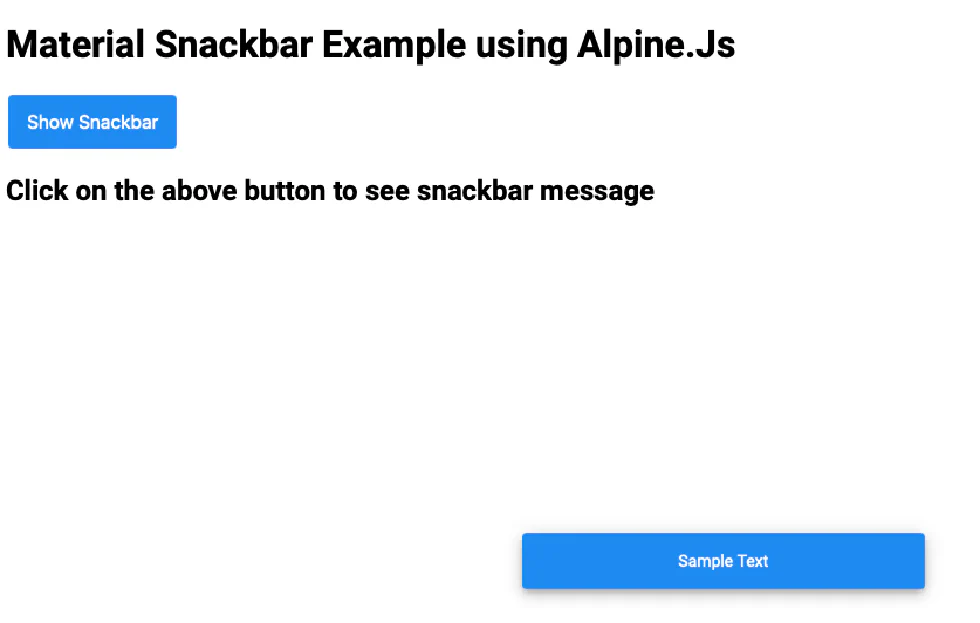
The main goal is to click the button and display the snackbar for a specific time with a custom message. Let’s start describing the strategies to achieve it using the AlpineJs framework.
Custom Javascript Event
One apparent approach is to use the javascript standard of dispatching and consuming javascript events on the window object.
This approach’s main advantage is the framework-agnostic aspect that may communicate with your AlpineJs components from everywhere in your app. Following the custom events documentation, when the button is clicked, a CustomEvent is created and then dispatched carrying the custom message.
You may check out the source and the result:
The HTML button code is:
1<button onclick="showAlpineSnackbar()" class="button">Show Snackbar</button>Then, we write the showAlpineSnackbar() javascript function in which the CustomEvent is created and dispatched:
1function showAlpineSnackbar() {
2    let event = new CustomEvent("alpine-snackbar-showMessage", {
3        detail: {
4            message: "Hello from outside of the component"
5        }
6    });
7    window.dispatchEvent(event);
8}
We created a CustomEvent object that defined the event name that we want to dispatch (alpine-snackbar-showMessage) and the information that the event carries (custom message).
The next step involves the creation of the AlpineJs snackbar component.
 1function alpineSnackbar() {
 2    return {
 3        show: false,
 4        message: null,
 5        init() {
 6            window.addEventListener("alpine-snackbar-showMessage", (event) => {
 7                this.showMessage(event.detail.message);
 8            });
 9        },
10        showMessage(msg) {
11            this.message = msg;
12            this.show = true;
13            window.setTimeout(() => {
14                this.show = false;
15                this.message = null;
16            }, 2000);
17        }
18    }
19}
We defined a component scope with two reactive variables:
showthat sets the snackbar visibility andmessagethat defines the displaying custom message
and two functions:
init()andshowMessage(msg)
In the init() function executed during the component initialization stage, we create the listener for the custom event. When the event fires, we call the showMessage function with the custom message as an argument, taken from the detail object.
The showMessage function initially sets the custom message and displays the snackbar by setting the show variable as true. Then, we place a timeout function that runs after two seconds and resets the snackbar’s state and hides it.
We chose to extract data and behavior into a function, which gives us breathing room for coding. The final step involves wiring up our component to the HTML:
1<div x-data="alpineSnackbar()" x-init="init()" x-show.transition="show" class="alpine-snackbar-wrapper">
2        <div class="alpine-snackbar-content" x-text="message"></div>
3 </div>The dispatch magic attribute
Another similar approach to custom events is by using the AlpineJs native $dispatch magic attribute. A magic attribute in AlpineJs is a user-defined attribute that implements a helpful operation. There many magic helpers native in AlpineJs or by importing additional packages. One of the native magic attributes is the $dispatch, a shortcut for creating a javascript custom event internally and fire up with a dispatchEvent.
The full snackbar example using the $dispatch magic helper is:
Therefore, by using the $dispatch magic attribute, we drop the function that creates the CustomEvent:
1<button x-data @click="$dispatch('alpine-snackbar-show-message', {
2        message: 'Hello from outside of the component'
3    })" class="button">Show Snackbar</button>
Please note that we utilized the x-data to create an Alpinejs component to use the magic attribute. The $dispatch syntax is straightforward. The first argument corresponds to the CustomEvent name, and the second is the payload that attaches to the event.
The snackbar AlpineJs component that consumes the $dispatch event is transformed:
1 <div x-data="alpineSnackbar()" @alpine-snackbar-show-message.window="showMessage($event.detail.message)"
2    x-show.transition="show" class="alpine-snackbar-wrapper">
3    <div class="alpine-snackbar-content" x-text="message"></div>
4</div>
The previously written init() function, executed during the initialization of the AlpineJs component on x-init attribute, is replaced with the equivalent x-on attribute (or its shorthand syntax @). This syntax attaches an event listener to the element it is declared. Therefore, we used the CustomEvent name to catch the event and execute the showMessage(msg) function with the corresponding custom message accessed by the $event object.
You should consider the way that event propagates when you are using the $dispatch. If you need to capture events from elements not under the same node, you need to use the .window modifier. This modifier installs the listener on the global window object instead of the DOM node on which it is declared.
The component magic helper
Another approach to cross-component communication is using the $component from AlpineJs Magic Helpers, a collection of magic properties and helper functions. The installation is simple enough, add the following script tag before the AlpineJs tag.
1<script src="https://cdn.jsdelivr.net/gh/alpine-collective/[email protected]/dist/component.min.js"></script>
2<script src="https://cdn.jsdelivr.net/gh/alpinejs/[email protected]/dist/alpine.min.js"></script>
The $component gives access to other AlpineJs components. To achieve this, you provide a unique id for the component you want to access using the x-id attribute.
1<div x-id="alpine-snack-bar"
2     x-data="{ show : false, message: null }"
3     x-show="show"
4     class="alpine-snackbar-wrapper">
5<div class="alpine-snackbar-content"
6     x-text="message"></div>
7</div>
Initially, we gave our snackbar component an id (alpine-snack-bar) and defined the two variables that we need. The show and message in x-data control the snackbar component’s visibility and content, respectively.
Then, in the button we write a function inside the buttonShowSnackbar component that display the snackbar with the appropriate message and hides after two seconds. The HTML code is:
1<button x-data="buttonShowSnackbar()"
2        @click="showAlpineSnackbar('alpine-snack-bar')"
3        class="button">Show
4        Snackbar</button>
The buttonShowSnackbar component:
 1function buttonShowSnackbar() {
 2    return {
 3        showAlpineSnackbar(id) {
 4            this.$component(id).message = "Hello from another component using the $component";
 5            this.$component(id).show = true;
 6            setTimeout(() => {
 7                this.$component(id).show = false;
 8                this.$component(id).message = null;
 9            }, 2000)
10        }
11    }
12}
We need to define the showAlpineSnackbar function inside an AlpineJs component to access the $component magic helper.
You can check the full example:
Having a global state by using the spruce library
Finally, another cross-communication pattern between AlpineJs components is by using a global state. For AlpineJs, there is spruce, an excellent global state management library from Ryan Chandler.
The installation is more or less the same. Add the spruce library script tag before the AlpineJs tag.
1<script src="https://cdn.jsdelivr.net/npm/@ryangjchandler/[email protected]/dist/spruce.umd.js"
2        defer></script>
3<script src="https://cdn.jsdelivr.net/gh/alpinejs/[email protected]/dist/alpine.min.js"
4        defer></script>
The approach is very similar to the $component pattern. The only difference is that we manipulate the global state instead of a specific component state. Initially, we initialize our global state:
1Spruce.store("snackbar", {
2    message: null,
3    show: false
4});
We create a store called snackbar with two state variables, the message to be shown and the show that controls the snackbar visibility.
The HTML part of the buttonShowAlpineSnackbar() component is exactly the same as before:
1<button x-data="buttonShowAlpineSnackbar()" @click="showMessage('A message from spruce')" class="button">Show Snackbar</button>The difference is that the showMessage(msg) function manipulates the snackbar store state:
 1function buttonShowAlpineSnackbar() {
 2    return {
 3        showMessage(msg) {
 4            this.$store.snackbar.message = msg;
 5            this.$store.snackbar.show = true;
 6            window.setTimeout(() => {
 7                this.$store.snackbar.show = false;
 8                this.$store.snackbar.message = null;
 9            }, 2000);
10        }
11    }
12}
The snackbar component is similar to the previous example, except that the snackbar store state controls the global state’s visibility and message content.
1<div x-data x-show.transition="$store.snackbar.show" class="alpine-snackbar-wrapper">
2  <div class="alpine-snackbar-content" x-text="$store.snackbar.message"></div>
3</div>
You can check the full example:
Conclusions
I presented four different approaches for cross-component communication. Although you can achieve the same outcome with every one of the above patterns, I think each one is better under a specific requirement. For example, the custom event javascript pattern is best suited for passing information between AlpineJs components and vanilla javascript code (or maybe another framework). Otherwise, the $dispatch magic attribute is more appropriate as it reduces the CustomEvent’s boilerplate code. When you want to manipulate a specific component, the $component magic helper is most suitable as it gives you direct access to it. Finally, the spruce library is better suitable for apps that need global state.
Share: