Landing Starter Template based on TailwindCSS, AlpineJs and build on esbuild and PostCSS
One of the constant requests I have as a freelancer programmer is constructing a landing page for a project/company/research project. Therefore, it is better to have an already starter template adopted as a base to iterate upon it quickly. My starter (https://github.com/wittyprogramming/tailwindcss-alpinejs-starter), is an opinionated template that has the following features:
- Tailwind CSS for styling
- Alpine.js for template/dynamic logic
- a simple build system that may help me scale up if the needs arise (for example, add scss for styles or Typescript)
Tailwind CSS is a highly customizable, low-level CSS framework gaining popularity lately. It is not opinionated as it gives you the building blocks for styling your components.
Unfortunately, tailwind requires a build system to take advantage of all its features. Furthermore, during deployment, the unused CSS must be removed because the style file becomes very large (>2Mb). The PostCSS and its plugins come to the rescue.
Alpine.js is very similar to tailwind but for the javascript. It provides the features of Vue.js with a much lower cost and - I think - a most suitable replacement for jQuery than other frameworks. If the code requirements are very light, then a build system is not required. Just add the Alpine.js package in a script tag and sprinkle your login in the HTML DOM file.
I must say that Alpine.js, which does not use a virtual DOM, has some tricked spots regarding the scope of nested components and their communication or the way nested loops are constructed, but for most cases - e.g., landing pages - is adequate. For more information, checkout out my post introducing Alpine.js.
My preference is to use Typescript (I love the IntelliSense capabilities that provide); therefore, I use the Evan Wallace’s esbuild, a fast Javascript/Typescript bundler, and a minifier.
Finally, we will use the gorgeous, simple, and versatile landing page design from the Creative Tim’s Tailwind Starter Kit for our starter template’s design. It way better for our productivity to have a well-formed, responsive design as a base.
Template initialization
Let’s initialize our starter:
md tailwindcss-alpinejs-starter
cd tailwindcss-alpinejs-starter
npm init
The structure of the template is straightforward:
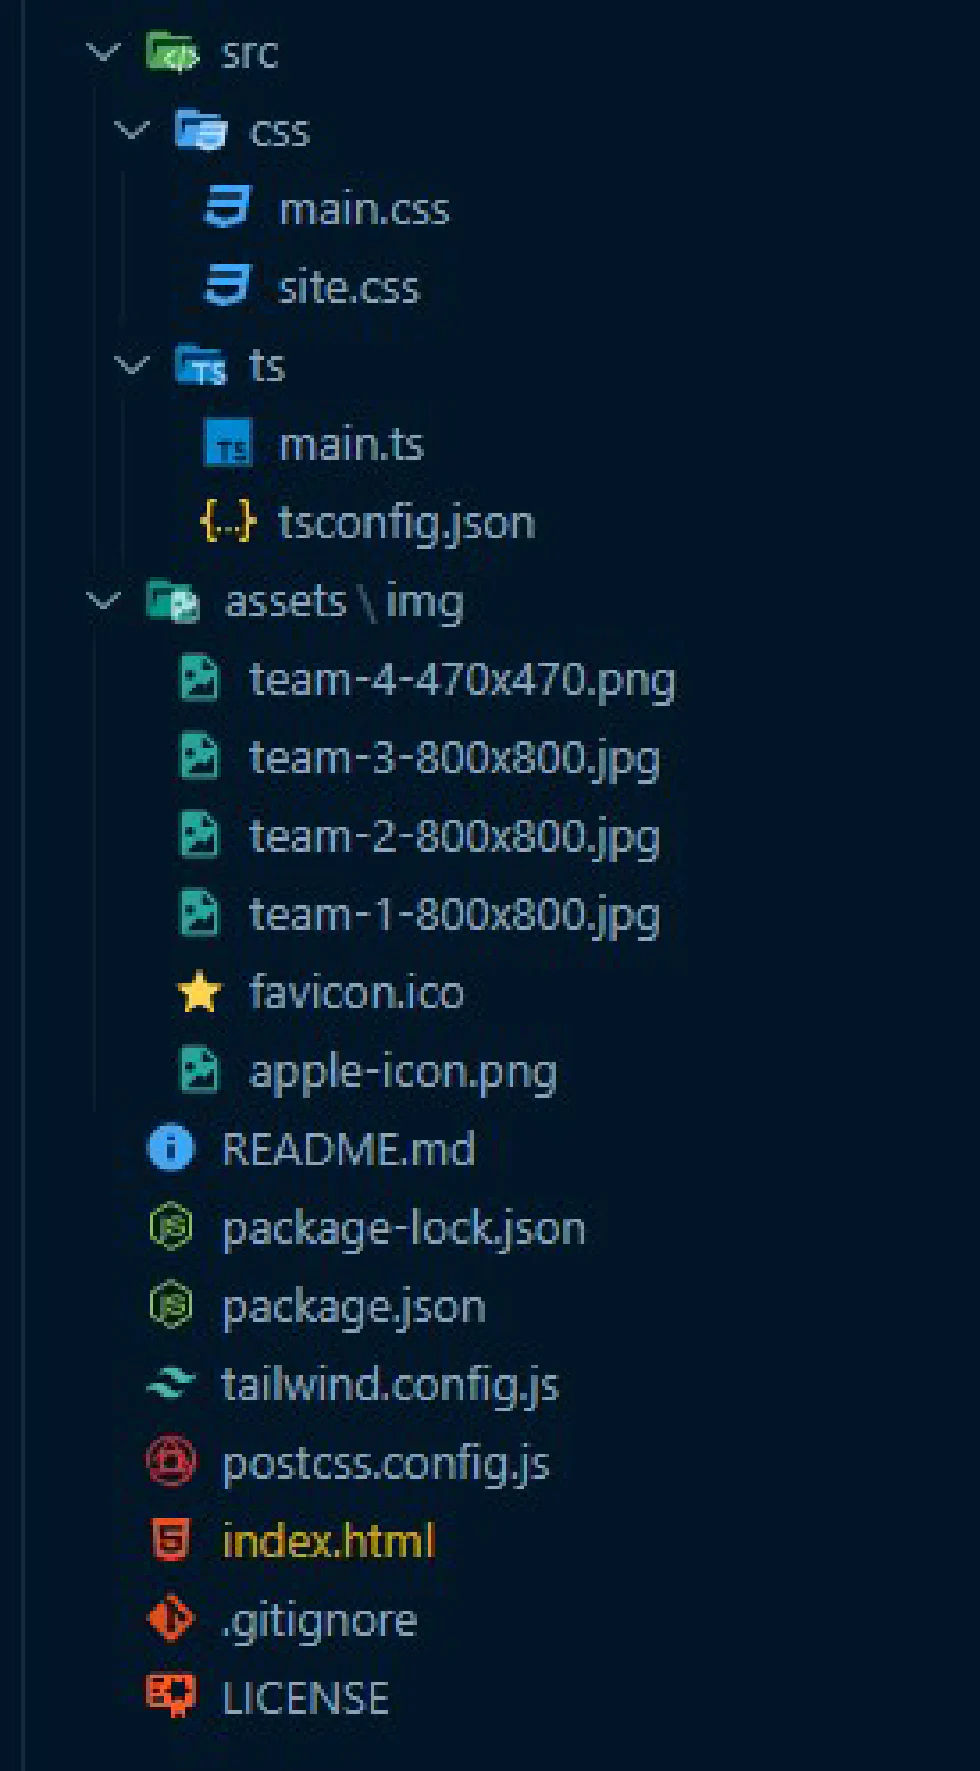
src/css/folder contains our template’s source styles with the filemain.cssas the entry point.src/ts/folder contains our typescript code with the filemain.tsas the entry point.
The assets/ folder contains the static assets - img, files to downloads, etc. Here, the output files from the CSS (CSS and web fonts) and js (js file) build system will be created.
Let’s begin by getting the landing.html and the Landing Page starter kit’s assets folder. We don’t need the vendor directory (contains fontawesome icons) as we will self-hosted it ourselves.
Then, install the required packages:
npm install alpinejs tailwindcss @fortawesome/fontawesome-freePostCSS configuration
It is time to create a build system for the styles based on PostCSS, a modern plugin-based CSS parser. The src/css/ folder contains our source CSS, which builds a minified clean version in the file assets/style.css.
Next, install the dev dependencies:
postcsspackages,- its cli version,
- and the plugins:
postcss-importfor using the import function in CSS,@fullhuman/postcss-purgecssfor the purgings of the unused CSS styles,postcss-copyfor copying assets referenced as web fonts , and, of course,- the
cssnanopackage for the minification.
npm install postcss postcss-cli postcss-import cssnano @fullhuman/postcss-purgecss --save-devOur postcss.config.js is:
 1const purgecss = require("@fullhuman/postcss-purgecss")({
 2  // Specify the paths to all of the template files in your project
 3  content: ["./index.html"],
 4  // This is the function used to extract class names from your templates
 5  defaultExtractor: (content) => {
 6    // Capture as liberally as possible, including things like `h-(screen-1.5)`
 7    const broadMatches = content.match(/[^<>"'`\s]*[^<>"'`\s:]/g) || [];
 8
 9    // Capture classes within other delimiters like .block(class="w-1/2") in Pug
10    const innerMatches = content.match(/[^<>"'`\s.()]*[^<>"'`\s.():]/g) || [];
11
12    return broadMatches.concat(innerMatches);
13  },
14});
15
16module.exports = {
17  plugins: [
18    require("postcss-import")(),
19    require("tailwindcss")(),
20    require("autoprefixer")(),
21    require("postcss-copy")({
22      dest: "assets/webfonts",
23    }),
24    ...(process.env.ENV_BUILD === "prod" ? [purgecss] : []),
25    ...(process.env.ENV_BUILD === "prod" ? [require("cssnano")()] : []),
26  ],
27};
The postcss.config.js format is straightforward. We define our plugins, and when we initiate the deployment build by using an environmental variable, we use the purge CSS and minification plugins.
The package.json build scripts are:
"watch-css": "postcss src/css/main.css -o assets/css/style.css -w",
"build-css": "cross-env ENV_BUILD=prod postcss src/css/main.css -o assets/css/style.css"
The cross-env is an npm package that sets environment variables in a cross-platform away.
esbuild configuration
Next step, the esbuild is added. Unfortunately, the esbuild does not have a watch function in its cli utility (see this issue). No worries, the chokidar-cli is an excellent cross-platform command-line utility to watch file system changes.
npm install esbuild chokidar-cli --save-dev– UPDATE 14 Feb 2021 –
The above is not valid anymore. After version v0.8.38, the esbuild added a -watch flag that makes the chokidar-cli package unnecessary. Moreover, after the v0.8.45, the esbuild added the --servedir= flag, allowing running a built-in web development server. The rest directions reflect that change. If you prefer the previous configuration with the chokidar-cli package, please refer to a previous commit in the GitHub repository
I like to use Typescript, as the IntelliSense that provides is impressive and very helpful. I understand that Typescript is not everyone’s favorite, and it may complicate some things unnecessary. Hence, the following step is not required, but to acquire the Typescript’s Intellisense superpower, install the typescript packages and initialize a tsconfig.js in the src/ts folder.
npm install --save-dev typescriptAnd in the src/ts folder run the following command to initialize the tsconfig.js file.
tsc --initIn main.ts, import the alpine.js.
The package scripts are very straightforward:
"watch-js": "esbuild src/ts/main.ts --bundle --sourcemap=inline --target=es2016 --outfile=assets/js/main.js --watch",
"debug-js": "esbuild src/ts/main.ts --bundle --sourcemap=inline --target=es2016 --outfile=assets/js/main.js --servedir=./",
"build-js": "esbuild src/ts/main.ts --bundle --minify --target=es2016 --outfile=assets/js/main.js",
The watch-js command watches for any changes and creates a debug build of our code with a source map. The debug-js command is the same as the watch-js command, but it runs the esbuild built-in web development server. The build-js command executes our deployment pipeline and outputs the minified code.
To run both commands, will use the concurrently npm package:
npm install concurrently --save-devand add the stript:
"start": "concurrently \"npm:watch-css\" \"npm:watch-js\"",
"dev": "concurrently \"npm:watch-css\" \"npm:debug-js\""
Finally, the deployment command runs the build-js and build-css commands and copy the index.html and assets\ folder to a dist folder using the copyfiles package. This dist folder is the deployment folder.
npm install copyfiles --save-devTherefore, during the development (for the watch mode) use:
npm startIf you want a web development server alongside use :
npm run devFor deployment, run:
npm run deployStarter Github Repository
You can use the provided starter template freely at https://github.com/wittyprogramming/tailwindcss-alpinejs-starter
Share: