Developing AlpineJs Apps Similar to Vue's Composition API
Vue’s primary motivation behind Composition API’s introduction was a cost-free mechanism for reusing logic between multiple components or apps. This idea is based on Functional Composition for programming, and its simplest form is about to produce a function by combining multiple other functions.
This technique is effortless to apply in AlpineJs using a combination of x-data and x-init attributes. First of all, if you never heard of this framework before, check out my introduction AlpineJs article.
Architecture
Let’s have as a base example the Netlify Contact Form described in the previous article. We will reshape the code to separate logic into different modules. The following figure depicts the new architecture.
We separate the code into three modules. One module will validate the form input utilizing another module that contains input validators, and an additional module will take care of the form backend submission.
Validators Module
Let’s briefly explain the depicted modules. The most simple module is the validators. It contains functions that validate if input value follows a corresponding rule. It includes four self-explanatory validators (isEmail, isRequired, hasMinLength and hasMaxLength) and the code is:
 1export function isEmail(value) {
 2  return new RegExp("^\\S+@\\S+[\\.][0-9a-z]+$").test(
 3    String(value).toLowerCase()
 4  );
 5}
 6
 7export function isRequired(value) {
 8    return value !== null && value !== undefined && value.length > 0;
 9}
10
11export function hasMinLength(value, length) {
12  return String(value).length >= length;
13}
14
15export function hasMaxLength(value, length) {
16  return String(value).length <= length;
17}
netlifySubmission Module
The netlifySubmission module handles the backend submission to the netlify service. It exposes a function named submitToNetlify that takes one argument, the form element intended to submit.
The code is taken from the previous article, modified for our module:
 1export function netlifySubmission() {
 2  return {
 3    submitToNetlify(formElement) {
 4      let body = new URLSearchParams(new FormData(formElement)).toString();
 5      return fetch("/", {
 6        method: "POST",
 7        headers: {
 8          "Content-Type": "application/x-www-form-urlencoded",
 9        },
10        body: body,
11      })
12        .then((response) => {
13          if (response.ok) {
14            formElement.reset();
15            alert("Thank you for your message!");
16          } else {
17            throw new Error(`Something went wrong: ${response.statusText}`);
18          }
19        })
20        .catch((error) => console.error(error));
21    },
22  };
23}formValidator Module
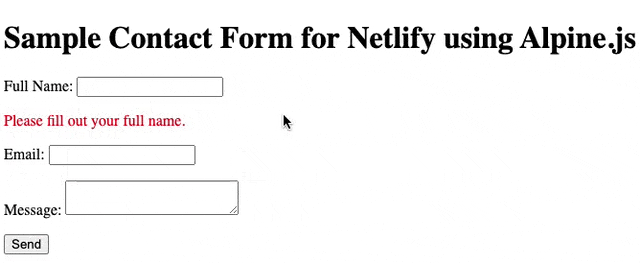
The formValidator module carries out the main work. It has six responsive data attributes that correspond to name, email, and comment input components that compose the submit form. The dirty boolean variables are needed to determine when a user has lost focus from the corresponding input component. It is used to prevent the error messages to appear before the user attempts to enter a value. It is used in the HTML like this:
1<p>
2        <label
3          >Full Name: <input x-model="name" x-on:blur="nameDirty = true" type="text" name="name"
4        /></label>
5      </p>
6      <p x-show.transition="!isNameValid() && nameDirty" style="color: red" x-cloak>
7        Please fill out your full name.
8      </p>
And it produces the following behavior:
The full code for the formValidator module is:
 1import {
 2  isEmail,
 3  hasMaxLength,
 4  hasMinLength,
 5  isRequired,
 6} from "./validators.mjs";
 7
 8export function formValidator() {
 9  let submitBackend;
10  return {
11    name: null,
12    nameDirty: false,
13    email: null,
14    emailDirty: false,
15    comments: null,
16    commentsDirty: false,
17    isNameValid(maxLength) {
18      return (
19        this.nameDirty &&
20        isRequired(this.name) &&
21        (maxLength ? hasMaxLength(this.name, maxLength) : true)
22      );
23    },
24    isEmailValid() {
25      return this.emailDirty && isEmail(this.email);
26    },
27    isCommentsValid(minLength) {
28      return (
29        this.commentsDirty &&
30        isRequired(this.comments) &&
31        (minLength ? hasMinLength(this.comments, minLength) : true)
32      );
33    },
34    isFormValid() {
35      return (
36        this.isNameValid() && this.isEmailValid() && this.isCommentsValid()
37      );
38    },
39    submitForm() {
40      this.nameDirty = true;
41      this.emailDirty = true;
42      this.commentsDirty = true;
43      if (!this.isFormValid()) return;
44      submitBackend(this.$el);
45    },
46    formValidator_init(backend) {
47      submitBackend = backend;
48      this.$watch("name", (value) =>
49        console.log(`The name change to ${value}`)
50      );
51    },
52  };
53}
Worth noticing is the formValidator_init function, which is executed during the x-init lifecycle, and define the backend submission function.
The above architecture provides a lot of flexibility with the code. For example, to change the backend, only the netlifySubmission module will need to be replaced without any other code modification. Or maybe use the validators to other form inputs in the app.
This design can be implemented in Alpine.js by combing the javascript’s object destructuring ability for compositing the object that the x-data attribute expects and the browser’s native module support.
Function Composition
Therefore, the final step is to create the AlpineJs component by using the previous modules. The Alpine.js expects a data object in its x-data attribute, which also declares the component scope; accordingly, a function may compose this data object by combining the modules’ exported functions and variables.
If it helps, you may think of this function as the setup property of a Vue component, although you cannot use the full capabilities that Vue’s setup function provides, for example, an effect or watch feature. For that, the x-init attribute and the $watch magic attribute may be of help. We write inside the HTML file that the form lies the following code:
 1 <script type="module" defer>
 2      import { formValidator } from "./form-validator.mjs"
 3      import { netlifySubmission } from "./netlify.mjs"
 4
 5      window.contactForm = function() {
 6         return {
 7           ...netlifySubmission(),
 8           ...formValidator(),
 9          init() {
10             this.formValidator_init(this.submitToNetlify);
11             this.$watch("email", (value) =>
12               console.log(`the value of the email is ${this.email}`)
13             );
14           }
15         }
16       }
17    </script>
First, we defined a script tag as a module and imported our other modules. In our example, we used the .mjs extension, although the standard .js extension will work as well. I recommend using the .mjs extension as it makes it easier to distinguish modules from regular javascript files. If you want to know more about the module support, check the Mozilla MDN guide.
We must then explicitly assign our function in the window global scope to be accessible from the x-data attribute because we use the module approach. Finally, we compose the final data object from the module’s exports using the javascript’s spread operator and initialize our formValidator module in the init() function.
The init() function is used in x-init attribute and is executed after the initialization of AlpineJs component. It mimics the mounted() or ngOnInit() hooks from Vue or Angular, respectively. In this function, we may initialize our modules as we do with the formValidator or include some side effects using $watch magic attribute.
Overall, I find this approach very scalable if you want to grow your AlpineJs to something more complicated or reduce some code repetition to your web app.
You may find a complete working version in the following codesandbox:
Share: